Deprecated: Automatic conversion of false to array is deprecated in /home2/celestial/public_html/wp-content/themes/Divi/core/functions.php on line 1466
Deprecated: Automatic conversion of false to array is deprecated in /home2/celestial/public_html/wp-content/themes/Divi/includes/builder/functions.php on line 12822
Now that we have created a database and a user with the appropriate permissions to access the database, we now need a method to connect to and edit the databases. Again, this can be done via the console if you have SSH access. The alternative is to use an application to manage the database. We will be focusing on the MySQL Workbench, which is the de facto standard for MySQL database management.
MySQL Workbench
MySQL Workbench is a visual database designing and modelling access tool for MySQL server relational databases. MySQL Workbench provides data modeling, SQL development, and comprehensive administration tools for server configuration, user administration, backup, and much more. MySQL Workbench is available on Windows, Linux and Mac OS X.
Installing
- Download the MySQL Workbench app. Use the Select Operating System drop-down menu to select the appropriate installer for your OS. We will be focusing on the Windows installer.
- Double-click the .msi file to start the installation process.
- In the Setup Type window, choose the Complete option to use all the features of MySQL Workbench.
- MySQL will install in C:\%PROGRAMFILES%\MySQL\MySQL Workbench\, where %PROGRAMFILES% is the default directory for programs for your locale.
Getting Started
- To start the application click Start > All Apps > mySQL > MySQL Workbench.
- The MySQL Workbench has three main modules which are displayed as icons in the left pane: 1) SQL Development, 2) Data Modeling, 3) Migration Wizard. We are going to be focusing on the module the MySQL Workbench opens to – the MySQL Development.
- When the Home Window is displayed, click the “+” sign next to the MySQL Connections to launch the Setup New Connection wizard.
- Connection Name: provide a name that will be descriptive of your database.
- Connection Method: Standard TCP/IP.
- Hostname: Your domain name or IP address.
- Port: 3306
- Username: The database username that you created in the previous steps.
- Password: Click the Store in Vault … and provide the username password for the database user that was created in the previous steps.
- Default Schema: Leave blank.
- Click the Test Connection button to validate the information entered.
- You should receive a new dialog box that says Successfully made the MySQL Connection.
- If the Test Connection fails, validate that all the information that you entered is correct. Affirm that you entered your home IP address into cPanel’s Remote MySQL module. If you did not do this the Test Connection will prompt you for a password and keep failing. See the earlier steps for this procedure.
- After receiving a successful test connection, click OK to accept the connection settings.
- Now under MySQL Connections you should see your newly created connection. Clicking on this connection will open the MySQL dashboard.
Navigating the MySQL Dashboard
The dashboard consists of a left-hand navigation pane, a lower output pane, a right SQL Snippets pane, and a main SQL query pane. The SQL query pane is similar to a SSH console on the server where you can run SQL queries to add tables, columns and data to a database. it is important, however, to apply the queries to the appropriate database or what is called a “Schema” in the navigation pane.
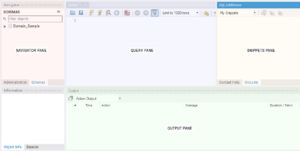
Working panes of the MySQL workbench.
- Click on the Schemas tab located in the bottom section of the Navigator pane. This will display a list of all the databases available to you and the schemas associated with them. A schema defines the attributes of a database, such as tables, columns, and properties. A database schema is essentially a description of the data in a database.
- Expand the schema of the database that you wish to administer by clicking on the arrow next to the database name. You should see Tables, Views, Stored Procedures, and Functions.
- There are two methods to create the SQL query for table creation. One is simply writing your own SQL statement and the other uses a table wizard in the MySQL Workbench. In order for clarity, we will discuss both options.
Writing our own SQL Table Creation Query
Writing SQL queries should be done in the main SQL query pane, or copied to this pane from your own text editor. Executing the query can be done by clicking in the lightening icon or selecting Query > Execute from the main menu. The following example statement creates a new table named articles:
SQL
[sql]CREATE TABLE IF NOT EXISTS articles (
article_id INT AUTO_INCREMENT PRIMARY KEY,
title VARCHAR(255) NOT NULL,
rcvd_date DATE,
author VARCHAR(255) NOT NULL,
article TEXT NOT NULL,
created_at TIMESTAMP DEFAULT CURRENT_TIMESTAMP
) ENGINE=INNODB;[/sql]
The article table has the following columns:
- The article_id has the datatype INT (integer), is set to auto-increment, and is assigned the primary key (the primary key uniquely identifies each record in a table, must contain unique values, hence the auto-increment, and cannot contain NULL values which is the absence of any data value.).
- The title and author columns have the datatype VARCHAR(255) which means that it is a variable character string column whose maximum length is 255. They also has a NOT NULL definition which means that the field is required.
- The rcvd_date has the DATE datatype. It does allow for NULL but if you do not insert data when the new row is created, it will use the current date.
- The article column has the TEXT datatype which holds up to 65535 characters and it is also NOT NULL.
- The created_at has the TIMESTAMP datatype that accepts the current time as the default value.
Using the table wizard in the MySQL Workbench
The table wizard is a menu-driven method for adding tables to your schema. It creates the SQL for you based on your selections.
- In the Navigator Pane expand the Schema that you would like modify, right-click on the Tables row and select Create Table.
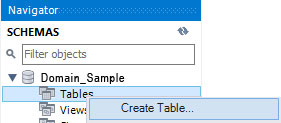
Expand the schema in order to see the tables.
- A new dialog window will appear in the Query Pane.
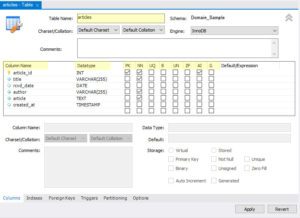
The Create Table Wizard in MySQL Workbench.
The Create Table Wizard in MySQL Workbench.[/caption]
- Enter the Table Name.
- Verify the Schema matched the database that you desire to edit.
- In the Column Name column, add the title of the column you wish to add.
- In the Datatype, either type or use the drop-down to select the datatype for that colume.
- Choose the options, if any, for the column:
- PK = Primary Key
- NN = Not Null
- UQ = Unique
- B = Binary
- UN = Unsigned
- ZF = Zero Fill
- AI = Auto Increment
- G = Generated.
- Click Apply and a pop-up window will display generated SQL script to be applied to the database for your review. If you are satisfied with the result, click Apply to create the table.
Adding Data to a Table
Now that we created a table, let’s populate the table with some data.
- In the Navigator Pane expand the Schema that you would like modify, expand the Tables, and then right-click the table that you want to enter data and click “Select Rows”.

Launch the data editing windows by right-clicking on the table and choosing Select Rows.
- You will be presented with the Result Grid where you can type or copy and paste data into each column of the table.

Enter data directly into the columns in the Result Grid window.
- Clicking on the Form Editor provides an alternative method of entering data which allows one to see more of the text/data being entered. To advance to the next row, you click the right arrow button.
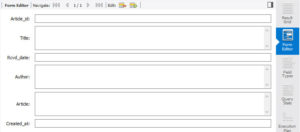
The Form Editor can be used to enter data into a SQL table.
The Form Editor can be used to enter data into a SQL table.[/caption]
- There are other ways to insert data into MySQL databases, such as using php script, PHPMyAdmin, and SQL code directly in the console. One of these methods may better suit your needs and I encourage you to explore these other options.
The next step in our tutorial is going to be how to extract and display data from the MySQL database.